Windows 10でDynamoRIOを使ってみた
DynamoRIOを使ってみたので忘れる前にメモを書いておく。 DynamoRIOはランタイムコード操作 (変換・コード挿入など) を行うためのツールである。いわゆる、Dynamic Binary Instrumentation(DBI)ツールの一つという位置づけで知られている。 DBIツールとしてIntel Pinも有名だが、Windows10で動かない(?)ようなので今回はWindows10でも動作するDynamoRIOを使ってみることにした。
環境
- Windows 10 Pro 64bit
- Visual Studio Community 2015
>systeminfo
OS 名:                  Microsoft Windows 10 Pro
OS バージョン:          10.0.14393 N/A ビルド 14393
OS ビルドの種類:        Multiprocessor Free
システムの種類:         x64-based PC
プロセッサ:             1 プロセッサインストール済みです。
                        [01]: Intel64 Family 6 Model 58 Stepping 9 GenuineIntel ~1900 Mhz
インストール
インストール方法について詳しくはここを参照してほしい。 今回はビルド済みのバイナリを含んだzip版をDirect Download Linksからダウンロードする。 サンプルコードのビルド用にCMakeとVisual Studioもインストールしておく。
サンプルコードの実行
ユーザはDynamoRIOが提供しているAPIを使用してDynamoRIOクライアントを作成できる。DynamoRIO本体と組み合わせる形で使用される自作のプログラムのことをDynamoRIOクライアントと呼んでいるらしい。Windowsの場合これをDLLにコンパイルして使うことになる。
まずは最初からsamples/以下に含まれているサンプルコードを動かしてみる。サンプルコードを実行する場合は-cパラメータの後にdllファイルのパスを指定する。
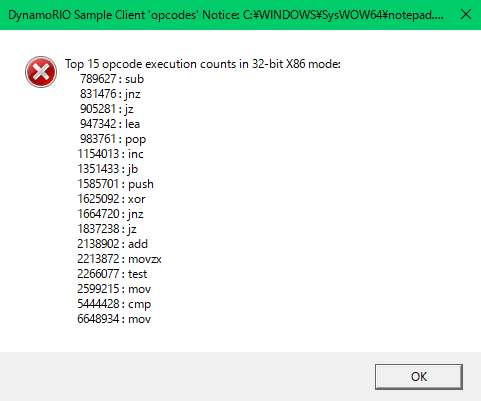
>bin32\drrun.exe -c samples\bin32\opcodes.dll -- notepad
opcodes.dllは実行されたオペコードをカウントする機能が実装されており、実行するとnotepadが立ち上がり、ウィンドウを閉じると実行されたオペコードTop15が表示される。

ツールの実行
サンプルコードとは別にDynamoRIOにはいくつかのツール1が内蔵されている。これを実行するには-tパラメータの後にツール名を指定する。
>bin32\drrun.exe -t drstrace -- notepad
drstraceはシステムコールをトレースし、ログに書き出す。
NtQueryVirtualMemory
    arg 0: 0xffffffff (type=HANDLE, size=0x4)
    arg 1: 0x002ea880 (type=void *, size=0x4)
    arg 2: 0x0 (type=int, size=0x4)
    arg 3: 0x02abf4f8 (type=<struct>*, size=0x4)
    arg 4: 0x1c (type=unsigned int, size=0x4)
    arg 5: 0x02abf4d4 (type=unsigned int*, size=0x4)
    succeeded =>
    arg 3: <NYI> (type=<struct>*, size=0x4)
    arg 5: 0x02abf4d4 => 0x1c (type=unsigned int*, size=0x4)
    retval: 0x0 (type=NTSTATUS, size=0x4)
NtQueryVirtualMemory
    arg 0: 0xffffffff (type=HANDLE, size=0x4)
    arg 1: 0x002ea880 (type=void *, size=0x4)
    arg 2: 0x3 (type=int, size=0x4)
    arg 3: 0x02abf514 (type=<struct>*, size=0x4)
    arg 4: 0x14 (type=unsigned int, size=0x4)
    arg 5: 0x00000000 (type=unsigned int*, size=0x4)
    succeeded =>
    arg 3: <NYI> (type=<struct>*, size=0x4)
    arg 5: 0x00000000 (type=unsigned int*, size=0x4)
    retval: 0x0 (type=NTSTATUS, size=0x4)
NtQueryVirtualMemory
    arg 0: 0xffffffff (type=HANDLE, size=0x4)
    arg 1: 0x002ea880 (type=void *, size=0x4)
    arg 2: 0x2 (type=int, size=0x4)
    arg 3: 0x02abf54c (type=<struct>*, size=0x4)
    arg 4: 0x212 (type=unsigned int, size=0x4)
    arg 5: 0x00000000 (type=unsigned int*, size=0x4)
    succeeded =>
    arg 3: <NYI> (type=<struct>*, size=0x4)
    arg 5: 0x00000000 (type=unsigned int*, size=0x4)
    retval: 0x0 (type=NTSTATUS, size=0x4)
NtQueryInformationProcess
    arg 0: 0xffffffff (type=HANDLE, size=0x4)
    arg 1: 0x24 (type=int, size=0x4)
    arg 2: 0x02abf520 (type=<struct>*, size=0x4)
    arg 3: 0x4 (type=unsigned int, size=0x4)
    arg 4: 0x00000000 (type=unsigned int*, size=0x4)
    succeeded =>
    arg 2: <NYI> (type=<struct>*, size=0x4)
    arg 4: 0x00000000 (type=unsigned int*, size=0x4)
    retval: 0x0 (type=NTSTATUS, size=0x4)
サンプルコードのビルド
ここではマニュアルを参考に適当なサンプルコードsample_cli.cを書いてビルドしてみる。 sample_cli.cは実行された基本ブロックの数をカウントする最低限のコードで、エラー処理は含めていない。
sample_cli.c
#include "dr_api.h"

static void event_exit(void);
static void bbcount();
static dr_emit_flags_t event_bb(void *drcontext, void *tag, instrlist_t *bb,
                                bool for_trace, bool translating);

static unsigned int global_count = 0;

DR_EXPORT void
dr_client_main(client_id_t id, int argc, const char *argv[])
{
    dr_enable_console_printing();
    dr_register_exit_event(event_exit);
    dr_register_bb_event(event_bb);
}

static void event_exit(void)
{
    dr_printf("bb count: %d\n", global_count);
}

static void bbcount()
{
    global_count++;
}

static dr_emit_flags_t
event_bb(void *drcontext, void *tag, instrlist_t *bb, bool for_trace, bool translating)
{
    dr_insert_clean_call(drcontext, bb, instrlist_first_app(bb), (void *)bbcount, false, 0);
    return DR_EMIT_DEFAULT;
}
CMakeLists.txt
add_library(sample_cli SHARED sample_cli.c)
find_package(DynamoRIO)
if(NOT DynamoRIO_FOUND)
    message(FATAL_ERROR"DynamoRIO package required to build")
endif(NOT DynamoRIO_FOUND)
configure_DynamoRIO_client(sample_cli)
フォルダ階層(ビルド前)
フォルダは以下の構成になっている。ここでは作成したVSプロジェクトと自作のサンプルコード置き場としてmybuild/とmysamples/を事前に作っている。
sample_cli.cとCMakeLists.txtはmysamples/内のsample_cli/以下に置いている。
C:.
├─bin32
├─bin64
├─cmake
├─docs
├─drmemory
├─dynamorio
├─ext
├─include
├─lib32
├─lib64
├─logs
├─mybuild    #VSプロジェクト置き場
├─mysamples  #自作サンプルコード置き場
│  └─sample_cli
│     ├─CMakeLists.txt
│     └─sample_cli.c
├─samples
└─tools
サンプルコードのビルド手順
>cd mybuild
>mkdir sample_cli && cd sample_cli
>cmake -DDynamoRIO_DIR="..\..\cmake" ..\..\mysamples\sample_cli
>(作成されたProject.slnをVisual Stduioで開いてソリューションのビルドを実行)
#Debugフォルダにtest_cli.dll、test_cli.lib、その他もろもろが作成される
フォルダ階層(ビルド後)
C:.
├─bin32
├─bin64
├─cmake
├─docs
├─drmemory
├─dynamorio
├─ext
├─include
├─lib32
├─lib64
├─logs
├─mybuild
│  └─sample_cli
│     └─Debug
│        ├─sample_cli.dll
│        └─sample_cli.lib
├─mysamples
│  └─sample_cli
│     ├─CMakeLists.txt
│     └─sample_cli.c
├─samples
└─tools
自作サンプルコードの実行
>bin32\drrun.exe -c mybuild\sample_cli\Debug\sample_cli.dll -- notepad
bb count: 10147879
参考リンク
- DynamoRIO Dynamic Instrumentation Tool Platform
- How To Build · DynamoRIO/dynamorio Wiki · GitHub
- Downloads · DynamoRIO/dynamorio Wiki · GitHub
- GitHub - DynamoRIO/dynamorio: Dynamic Instrumentation Tool Platform
- DynamoRIO API: The DynamoRIO API
-
実際にはサンプルコードより大規模で洗練されたDynamoRIOクライアントである。↩